How to enable MFA for Auth0 using Authsignal
Auth0 is a great platform for adding core identity functionality to your app, especially for requirements like federation (Single Sign On or “SSO”), token management, or using their Universal Login page.
But there are a few reasons why you might want to turbo-charge Auth0’s base functionality with additional tools like Authsignal, especially when it comes to MFA and step-up authentication.
Here are a few reasons:
- You want to enable more Passwordless MFA factors without upgrading your Auth0 plan.
- You want flexibility on how and when to enrol a user for MFA.
- You want to control exactly when and where users must complete step-up MFA challenges in your app with conditional logic. This logic might need to depend on the action or transaction which the user is performing and not on their authenticated session (the technical term for this is “transaction signing”).
- You want to add step-up authentication flows anywhere in your app without having to build your own UI (similar to Auth0’s Universal Login Page — but for MFA). This could include other user-facing touch points like customer support chatbots.
- You want to keep an audit trail of reasons why a user has been prompted to complete an MFA challenge.
- Your app is in a highly security-focused vertical — like Crypto On-Ramps, FinTech and Marketplaces — which typically have more nuanced MFA requirements.
Authsignal’s suite of tools provides solutions to all of the above, giving your app more flexibility and visibility without the need to migrate away from Auth0.
The key features of Authsignal for Auth0 are:
- A suite of Passwordless Authentication factors that can work directly with Auth0: SMS, authenticator apps (TOTP), FIDO2/WebAuthn, and email magic links.
- A no-code fraud rules engine that you can manage completely without the need for engineers.
- A full audit trail and a single view of your customer, which includes sign-in activity as well as key points specific to your customer journey (like a withdrawal flow in a FinTech app).
- A suite of SDK helpers that work out-of-the-box with Auth0 Actions.
This blog post will demonstrate how to add MFA to your app by integrating Auth0 with Authsignal in five quick steps.
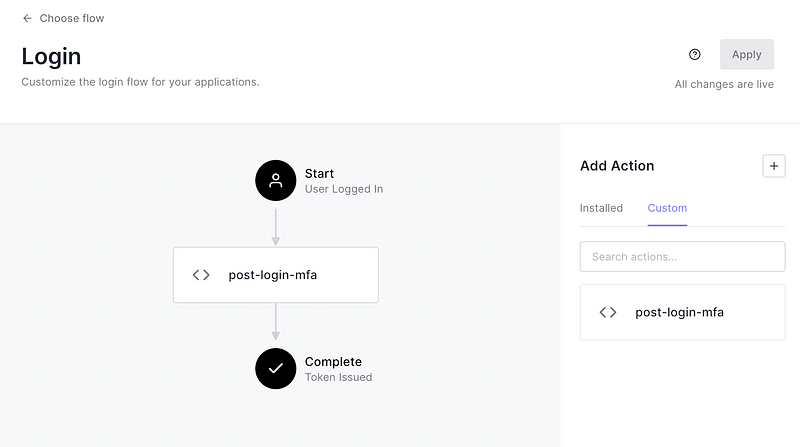
Step 1 — Create an Auth0 Action
In the Auth0 Dashboard, go to Actions → Library and select “Build Custom”. Then select the “Login / Post Login” trigger and give the action an appropriate name (for example “post-login-mfa”).

Step 2 — Add your Authsignal Secret Key
Now your action has been created, create a new secret called AUTHSIGNAL_SECRET and provide the value of your secret from the API Keys section in the Authsignal Portal.

Step 3 — Add Dependencies
Add the @authsignal/node dependency.

Step 4 — Add the Authsignal for Auth0 action code
Add the following code snippet to the action.
const { handleAuth0ExecutePostLogin, handleAuth0ContinuePostLogin } = require("@authsignal/node");exports.onExecutePostLogin = handleAuth0ExecutePostLogin;exports.onContinuePostLogin = handleAuth0ContinuePostLogin;
Step 5 — Add the Authsignal for Auth0 action code
Now connect your action in the Flows section of the Auth0 Dashboard by dragging it into the Login flow.
And that’s it, the above 5 steps are all that you have to configure within your Auth0 tenant, and everything else is handled seamlessly by Authsignal. It’s that simple.
To view the comprehensive documentation, check out our Developer Docs, sign up to Authsignal and start enabling MFA for Auth0.